Contextual Related Posts includes a basic Gutenberg block that can be used as a replacement to the widget or shortcode to display the related posts. This block can be used in your posts, pages or any other custom post type. You can also use it within the Site Editor if you are using a block theme.
Contextual Related Posts Pro brings an advanced Query Loop block is an advanced block that allows you to display the related posts based on specified parameters. You can use the pre-built block patterns or create your own block patterns for use within posts or the site editor.
Adding the Blocks
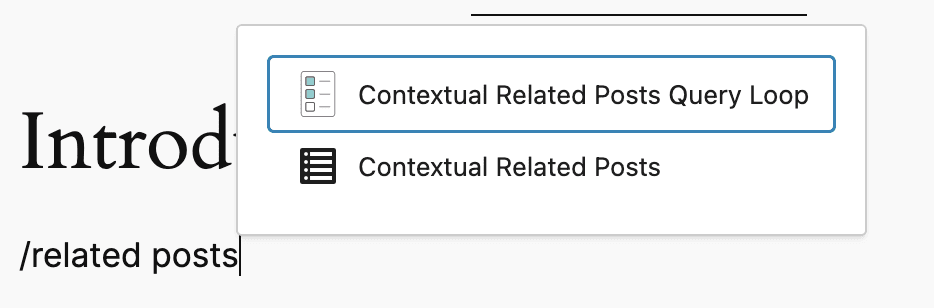
To add the Contextual Related Posts blocks, click on the plus (+) icon in the block editor. Search for “Related Posts” and you’ll see the “Contextual Related Posts” block appear. Click on it to insert the block into your content area.
If you’re using the pro version, you will also see the “Contextual Related Posts Query Loop” in the list.
Configuring the basic Gutenberg Block
The Related Posts block allows you the preview the related posts directly in the block editor. You can customise various aspects of the block using the sidebar as follows:
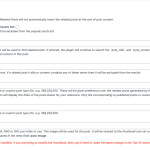
| Setting | Type | Description |
|---|---|---|
| Show Heading | Toggle (ON/OFF) | This displays a heading before the related Posts. If you toggle this on, you can then modify the text of the heading. Default is <h3>Related Posts</h3>. |
| Number of Posts | Number | The maximum number of related posts that will be displayed by the plugin. |
| Offset | Number | Number of posts to skip from the top. |
| Show excerpt | Toggle (ON/OFF) | Displays the excerpt of each related post. By default, Contextual Related Posts will use the post excerpt that is manually created. If no post excerpt is found, then the plugin will generate the excerpt from the post content based from excerpt length set in the global Output settings panel. |
| Show author | Toggle (ON/OFF) | Displays the author for each related post. The author name is preceded with the text “by”. e.g. by Doctor Watson. |
| Show date | Toggle (ON/OFF) | Displays the published date of each related post. |
| Thumbnail option | Dropdown | This provides four self-explanatory options. “Before title”, “After title”, “Only thumbnail, “Only text”. |
| Order posts | Radio selector | This allows you order the related posts by relevance (default), date or randomly. This option directly modifies the related posts SQL query. Selecting random above will randomise the posts that are fetched from the database. This option will not take effect if you choose to Cache the HTML output in the settings page. |
| Randomize posts | Toggle (ON/OFF) | This option allows the top related posts to be “shuffled” on each page load. Unlike the previous option, the related posts will be the same, except that their order will be changed if the page is reloaded. This option will not take effect if you choose to Cache the HTML output in the settings page. |
| Other attributes | Textarea field | Enter other attributes in a URL-style string-query. It supports any of the plugins global settings e.g. post_types=post,page&link_nofollow=1&exclude_post_ids=5,6. |
Using the Contextual Related Posts Query Loop Block
If you are already familiar with the Core Query Loop Block included in WordPress, then this guide will be familiar to you. If not, the below guide should be able to get your started on using this block.
The Contextual Related Posts Query Loop block allows you to flexibly modify the output and layout of the block. You have a few ready made patterns that are currently included and with more coming in future versions. Here is a short guide on how to us it:
1. Configuring the Query Loop Block
The Query Loop block allows you to customise the query that will be used to retrieve the related posts. You can configure the following settings:
- Number of Posts: Enter the number of posts to display per page.
- Post Types: Select one or multiple post types to include in the related posts.
- Offset: Set the number of posts to skip from the beginning of the results.
- Order By: Choose how the results should be sorted (e.g., relevance, date, title, author, etc.).
- Order: Toggle between Ascending and Descending.
- Filters – Taxonomy: Filter the results by specific taxonomies (e.g., category, tag).
- Filters – Authors: Filter the results by specific authors.
2. Customise the Layout
When you insert the Query Loop block, the plugin selects a default grid layout with the post’s featured image and the post title.
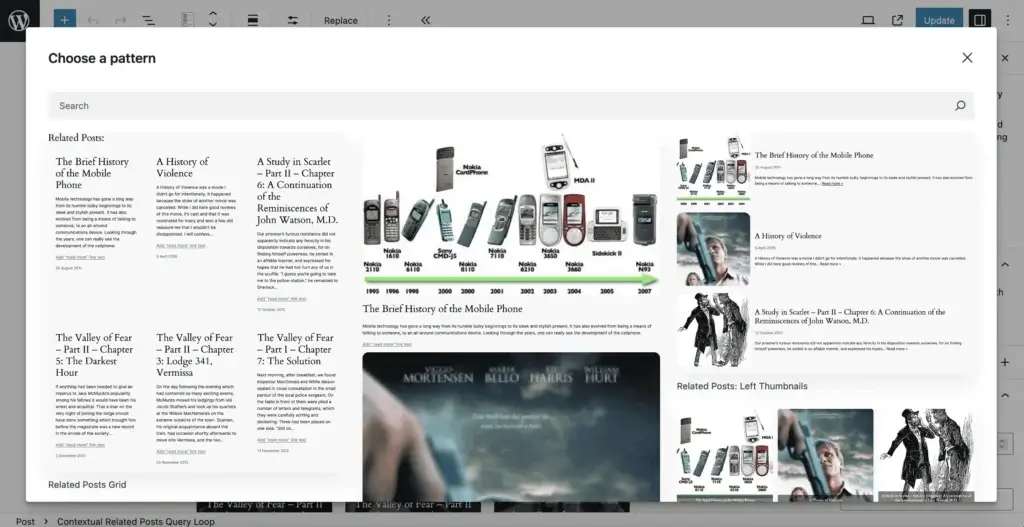
The Query Loop block provides several layout options (patterns) to choose from, including:
- List: Display the posts or pages in a vertical list.
- Grid: Text, Excerpt and Date grid.
- Left Thumbnail: As the name suggests, the thumbnail is displayed in the left column and the right column contains the title, date and excerpt.
- Rounded Thumbs: This aims to replicate the display of the Rounded Thumbnails of the basic Gutenberg block.
To select a pattern, you can select the block using the navigation bar at the bottom left of the editor or the Parent block in the top/hover toolbar.

Once you do so, you’ll see the “Replace” button appear which allows you to select from the different patterns.
4. Add Additional Blocks
Within the Core Query Loop block, you can add additional blocks to display specific content for each post or page, such as:
- Post Title: Show the title of the post or page.
- Post Content: Display the full content of the post or page.
- Post Date: Show the date the post or page was published.
- Post Featured Image: Display the featured image of the post or page.
You can arrange and style these blocks to create a visually appealing and informative layout for your content.