WordPress block development: Building multiple blocks
This is the fifth part of my Gutenberg block development tutorial series. In the past four chapters, we’ve learnt how to build static and dynamic blocks, add custom settings and change styles.
Many of my plugins contained a single block which served as an alternative to the shortcode. However, I did need to build two blocks for my Knowledge Base plugin.
In this article, I’ll explain how you can build multiple blocks in a single plugin. I’ll assume you’ve already gone through the first parts of the tutorial or already have a few blocks which you want to merge under a single plugin.
Step 0: Create your blocks
Use the @wordpress/create-block tool to create the plugins. For this tutorial, I’ll assume that you’ve already created the static block and the dynamic block.
Let’s use the dynamic block repository as the base plugin and we’ll merge the static block with it. We’ll also update the package.json to allow us to run the npm builds independently. This is useful when you want to modify a single block and don’t want all the blocks to be updated by the script.
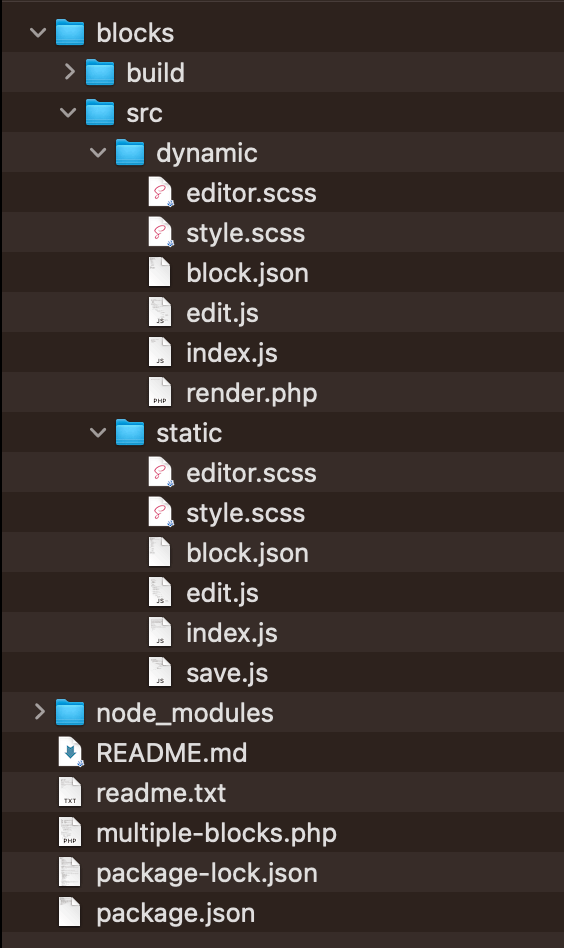
Step 1: Move the blocks into their folders
Create a new folder blocks in the plugin folder. Move the src folder from the basic-block plugin into it and rename it to static. Repeat the same with the dynamic plugin’s src, calling the new folder dynamic. We don’t need to move the build folders as these are automatically created when we run the scripts package.
If you’re building a multiple-block plugin from scratch, you can also run the following function in the folder you want to create the blocks.
npx @wordpress/create-block --no-pluginYour folder structure will look like this:
Step 2: Update package.json
The latest version of @wordpress/scripts will scan all the block.json files in your src directory. We can create custom run and build scripts by updating the scripts attribute in package.json to include these:
"scripts": {
	"start": "wp-scripts start --webpack-src-dir=blocks/src/ --output-path=blocks/build/",
	"build": "wp-scripts build --webpack-src-dir=blocks/src/ --output-path=blocks/build/",
	"start:static": "wp-scripts start --webpack-src-dir=blocks/src/static --output-path=blocks/build/static",
	"build:static": "wp-scripts build --webpack-src-dir=blocks/src/static --output-path=blocks/build/static",
	"start:dynamic": "wp-scripts start --webpack-src-dir=blocks/src/dynamic --output-path=blocks/build/dynamic",
	"build:dynamic": "wp-scripts build --webpack-src-dir=blocks/src/dynamic --output-path=blocks/build/dynamic"
}
In the above update, we create new start and build scripts as well as update the original ones as above. These use the two parameters:
--webpack-src-dirwhich specifies the relative path to the source of the scripts--output-pathwhich specifies where we want our build files to be saved
In the future we can run npm build:static to run the rebuild script for the static block. And similarly for the dynamic block. You can also run npm build to build all the blocks at the same time.
Step 3: Update the block registration function
While you can add multiple calls to register_block_type for each block to register, I prefer using the following code to register multiple blocks. This allows me the flexibility to add additional blocks in the future with the flexibility of having a render_callback attribute passed.
function wz_multiple_blocks_register_blocks() {

	// Register blocks in the format $dir => $render_callback.
	$blocks = array(
		'dynamic' => 'wz_tutorial_dynamic_block_recent_posts', // Dynamic block with a callback.
		'static'  => '', // Static block. Doesn't need a callback.
	);

	foreach ( $blocks as $dir => $render_callback ) {
		$args = array();
		if ( ! empty( $render_callback ) ) {
			$args['render_callback'] = $render_callback;
		}
		register_block_type( __DIR__ . '/blocks/build/' . $dir, $args );
	}
}
add_action( 'init', 'wz_multiple_blocks_register_blocks' );
Step 4: Add the render_callback functions from the dynamic-blocks plugin
If you’re merging the plugins as per the above tutorial, you will need to add the wz_tutorial_dynamic_block_recent_posts() function we created in WordPress block development: Building dynamic blocks.
Step 5: Optionally change the name of your plugin
If you’re following this tutorial series, you might want to change the name of the plugin details by updating the main plugin file and the readme.txt.
In conclusion and what’s next
This concludes my Gutenberg Block Development Tutorial series. By now, you should have learned how to create both static and dynamic blocks, add settings to your sidebar, and add multiple blocks within the same plugin.
I continue to explore Gutenberg, both as a developer and a user. So, this doesn’t mark the end of my development tutorials.
If you found this series helpful, consider subscribing to my newsletter and following @ajaydsouza and @WebberZone on Twitter to stay informed.
The code on GitHub
You can view and download the Multiple blocks plugin example on GitHub.
Bonus: Sample repository of my blocks
I continue to manage and update blocks for my different plugins in their individual repositories. While it adds an additional step, I find it straightforward to maintain and make necessary changes.
You can view the source code in GitHub.
Sources
These are a few sources that helped me to write this tutorial.


