How to disable auto-update notification emails in WordPress
WordPress core, plugins and themes are constantly updated with new features, bug fixes, and security enhancements. Some users may forget or neglect to update their WordPress core, plugins, or themes manually which can expose their sites to potential vulnerabilities or compatibility issues.
That’s why WordPress offers the option to enable auto-updates. Auto-updates allow WordPress to automatically install the latest versions of core, plugins and themes without requiring any user intervention.
I recently set up my new Macbook Air M2. Instead of importing my test sites from my old Macbook Air, I decided to start afresh using MAMP Pro. While I am diligent in pushing updates to my production sites, on my test sites, I prefer turning on auto-updates. This saves me a lot of time and effort running manual updates and I don’t have to worry if something goes wrong.
When you activate auto-updates, WordPress sends you an email with details on what’s been updated. Additionally, if you’re on your test site, this goes through localhost which you’d ideally want to avoid.
In this post, I’ll show you how to enable auto-updating core, plugins and themes. And, you’ll then learn how to stop the auto-update emails using simple pieces of code.
How to Enable Auto-updates for WordPress Core, Plugins and Themes
You have a few options to enable auto-updates ranging from using a few snippets of code, an excellent plugin to give you finer control or just manually letting WordPress handle it directly.
Method 1: Enable Auto-updates Using Code
To enable auto-updates for WordPress core updates, add the following code in your wp-config.php file:
// Enable auto-updates for WordPress core updates.
define( 'WP_AUTO_UPDATE_CORE', true );
This code will enable all types of core updates: development, minor, and major. However, you can also specify which types of core updates you want to enable by using one of these values instead of true:
- ‘minor’ – This will enable only minor updates, such as maintenance and security releases
- false – This will disable all core updates
To enable auto-updates for WordPress plugins and themes, you will need to edit your functions.php file or preferably a Must Use Plugin.
This functions.php file contains the code that defines the functionality and behaviour of your theme. You can access it from your WordPress dashboard by going to Appearance > Theme File Editor and selecting the functions.php file from the right sidebar.
Before you edit this file, make sure you have a backup of your site and theme in case something goes wrong. You can also use a child theme or a code snippets plugin to avoid losing your changes when you update your theme.
// Enable auto-updates for WordPress plugins and themes.
add_filter( 'auto_update_plugin', '__return_true' );
add_filter( 'auto_update_theme', '__return_true' );
This code will enable auto-updates for all plugins and themes installed on your site. To enable or disable auto-updates for individual plugins or themes from your WordPress dashboard see Method 3 below.
Method 2: Enable Auto-updates Using a Plugin
If you prefer not to edit any code, you can use a plugin to enable auto-updates for WordPress core, plugins, and themes. Several plugins can help you with this task, but we will use Easy Updates Manager as an example. Easy Updates Manager lets you easily manage all aspects of WordPress updates with one plugin.
To use Easy Updates Manager, follow these steps:
- Install and activate the Easy Updates Manager plugin from your WordPress dashboard
- Go to Dashboard > Updates Options and click on the General tab
- Here you can enable or disable auto-updates for WordPress core, plugins, themes, translations, and more
- You can also choose whether you want to receive email notifications for successful or failed updates
- Save your changes
You can also customize the auto-update settings for individual plugins or themes by going to the Plugins tab or Themes tab on the same page.
Method 3: Enable Auto-updates Manually
If you don’t want to use any code or plugin, you can also enable auto-updates manually from your WordPress dashboard. This method gives you more control over which components you want to update automatically.
To enable auto-updates manually for WordPress core updates, follow these steps:
- Go to Dashboard > Updates
- Click on the link which says Enable automatic updates for all new versions of WordPress
- Once you’ve done so, the link changes to Switch to automatic updates for maintenance and security releases only
To enable auto-updates manually for WordPress plugins and themes, follow these steps:
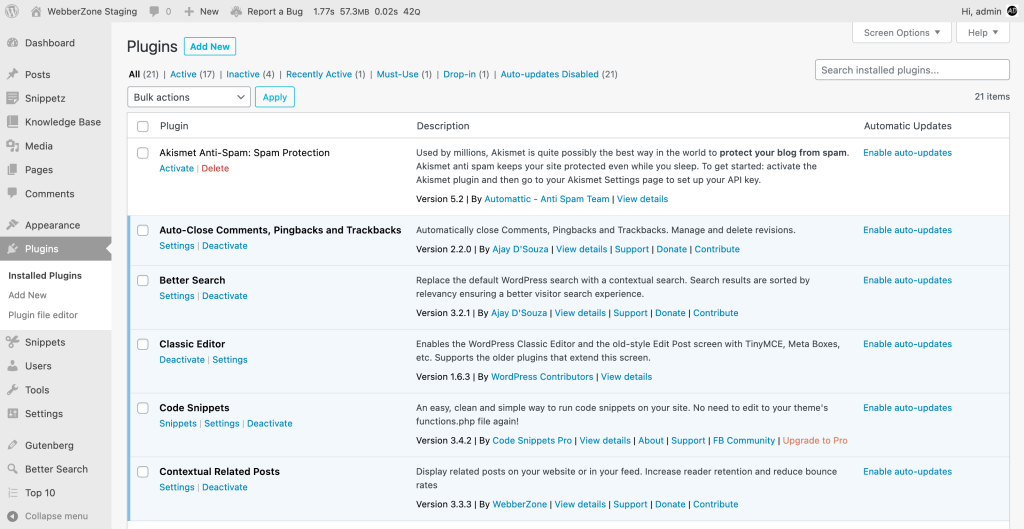
- Go to Plugins > Installed Plugins or Appearance > Themes and click on the “Enable auto-updates” link next to each plugin or theme that you want to update automatically.
- You can also disable auto-updates for any plugin or theme by clicking on the “Disable auto-updates” link next to it.
- To enable multiple plugins (or themes in Multisite Network view), first select which ones you want to make edits to, then select Enable Auto-updates from the Bulk actions dropdown. Hit the Apply button.
How to Disable Auto-update Emails in WordPress
Now that you have enabled auto-updates, you can follow the below instructions to disable auto-update emails in WordPress using two methods: code and plugin.
Method 1: Disable Auto-update Emails Using Code
To disable auto-update emails for WordPress core updates, add the following code to your Must Use plugin:
// Disable auto-update emails for WordPress core updates.
add_filter( 'auto_core_update_send_email', 'wz_stop_core_update_emails', 10, 4 );

function wz_stop_core_update_emails( $send, $type, $core_update, $result ) {
    if ( ! empty( $type ) && 'success' === $type ) {
        return false;
    }

    return true;
}
This code will prevent WordPress from sending you an email when the core is updated successfully. You will still receive an email if the update fails or if there is a critical security update. Alternatively, you can use the below code to completely disable all core update emails.
// Disable update emails.
add_filter( 'auto_core_update_send_email', '__return_false' );
To disable auto-update emails for WordPress themes and plugins, add the following code to the end of your functions.php file:
// Disable auto-update emails for WordPress themes and plugins.
add_filter( 'auto_theme_update_send_email', '__return_false' );
add_filter( 'auto_plugin_update_send_email', '__return_false' );
This code will stop WordPress from sending you any email notifications when your themes or plugins are updated automatically.
Method 2: Disable Auto-update Emails Using a Plugin
If you prefer not to edit any code, you can use a plugin to disable auto-update emails in WordPress. If you’re using Easy Updates Manager, you can directly use that to disable any auto-update emails. However, in case you have configured the updates manually, then you can use Disable Automatic Update Email Notifications.
Simply install and activate the Disable Automatic Update Email Notifications plugin from your WordPress dashboard and you’re done!
Conclusion
Auto-updates are a useful feature of WordPress that keeps your site secure and up-to-date with the latest versions of WordPress core, plugins, and themes. However, some users may want to have more control over when and how these updates are performed.
Auto-update emails are a useful feature of WordPress that keeps you informed of the latest changes and improvements to your site. However, some users may find them unnecessary and want to disable them.
In this post, you would have learned to enable auto-updates for WordPress core, plugins, and themes using three methods: code, plugin, and manual. You can choose the method that suits your preference and skill level.
Additionally, you would have learned how to disable auto-update emails in WordPress using two methods: code and plugin.
I hope you found this post helpful and informative. If you have any questions or feedback, please leave a comment below.


