How to Set Up PHPStan with WordPress and Visual Studio Code: A Step-by-Step Guide
As a plugin developer, it is imperative to write secure and error-free code. PHP is a widely used programming language, but it has peculiarities and pitfalls that can lead to unexpected errors and warnings in your code. Even simple things like a typo or a missing semicolon can cause problems, and it can be challenging to identify such errors, particularly in extensive projects.
To mitigate these issues, I recommend using PHPStan, a static analysis tool for PHP that scans your code and detects potential errors and bugs without executing your code. PHPStan can help you write cleaner, safer, and more reliable code, and it can save you time in the long run. This tool is particularly useful for me as an active plugin developer with over 100k users.
In this blog post, I will demonstrate how to set up PHPStan with WordPress and Visual Studio Code. You will learn how to install, configure, and run PHPStan, and how to integrate it with your editor for a smoother development experience. By the end of this post, you will be able to use PHPStan to analyze and improve your WordPress code.
Prerequisites
Before delving into the setup process, ensure the following prerequisites are in place:
- Composer: Install Composer, the PHP dependency manager
- WordPress: Set up a local WordPress instance for development
- Visual Studio Code: Install VS Code, a versatile code editor
I highly recommend running the latest version of WordPress and PHP8+. PHPStan requires PHP >=7.2 to run.
PHPStan works best with modern object-oriented code. However, it also works well with functional PHP code. I highly recommend using PHPDoc to document your code as this helps PHPStan to analyse the code better and will also help you fix any errors – I had several errors in my PHPDoc blocks which I was able to clean up with PHPStan.
Installing PHPStan
The recommended method to install PHPStan is via Composer and it’s very easy to do – even for someone like me who used to avoid it.
Open your terminal and navigate to your WordPress project directory. Run the following command:
composer require --dev phpstan/phpstanThis installs PHPStan as a development dependency for your project.
Installing WordPress extensions for PHPStan
If you’re planning to develop a WordPress plugin or Theme, you won’t be including the WordPress core within your source code and hence PHPStan will not understand basic WordPress functions or classes e.g. WP_Query or get_posts() and will throw up errors in your code.
To tell PHPStan about our WordPress core code, we can use the extension szepeviktor/phpstan-wordpress.
Add this package to your project:
composer require --dev szepeviktor/phpstan-wordpressMake PHPStan find it automatically using phpstan/extension-installer:
composer require --dev phpstan/extension-installerConfiguring phpstan
To configure phpstan, you should create a phpstan.neon file in the root of your project. This file contains various settings and options for phpstan, such as the analysis level, the paths to scan, the autoload files, and the files or directories to exclude. You can also customize phpstan’s behaviour and rules using this file. This is a more efficient way of running PHPStan vs passing parameters in the command line.
Here is an extract of the phpstan.neon file from my plugin Better Search:
parameters:
    level: 5 # the analysis level, from 0 (loose) to 8 (strict)
    paths: # the paths to scan
        - better-search.php
        - uninstall.php
        - includes/
        - templates/
    ignoreErrors:
The important parameter above is level which tells PHPStan how strictly it needs to review your code. If this is the first time that you’re using PHPStan, I suggest starting from 1 and working your way up. I’ve found that 5 is a good level for me to scan my code with as I still don’t use typehints in my code. Someday.
From the documentation, here is a brief overview of what’s checked on each level. Levels are cumulative – for example, running level 5 also gives you all the checks from levels 0-4.
- basic checks, unknown classes, unknown functions, unknown methods called on
$this, wrong number of arguments passed to those methods and functions, always undefined variables - possibly undefined variables, unknown magic methods and properties on classes with
__calland__get - unknown methods checked on all expressions (not just
$this), validating PHPDocs - return types, types assigned to properties
- basic dead code checking – always false
instanceofand other type checks, deadelsebranches, unreachable code after return; etc. - checking types of arguments passed to methods and functions
- report missing typehints
- report partially wrong union types – if you call a method that only exists on some types in a union type, level 7 starts to report that; other possibly incorrect situations
- report calling methods and accessing properties on nullable types
- be strict about the
mixedtype – the only allowed operation you can do with it is to pass it to anothermixed
The paths parameter, as the name suggests, tells PHPStan what paths to scan – both files and directories. I’d suggest limiting this to your code and avoiding scanning the vendor directories.
Check the detailed configuration reference for additional settings that you can configure.
Running PHPStan
Execute PHPStan from the command line using the vendor/bin/phpstan executable:
vendor/bin/phpstan analyse --memory-limit=2048MWe pass the --memory-limit parameter to override the default PHP limit, which you’ll need to do when you’re scanning multiple files.
For convenience, add a script to the composer.json file:
"scripts": {
   "phpstan": "vendor/bin/phpstan analyse --memory-limit=2048M"
}
You can then run composer phpstan to analyse your code.
Once you do so, you’ll likely see several errors being flagged by PHPStan as you can see in the screenshot below.
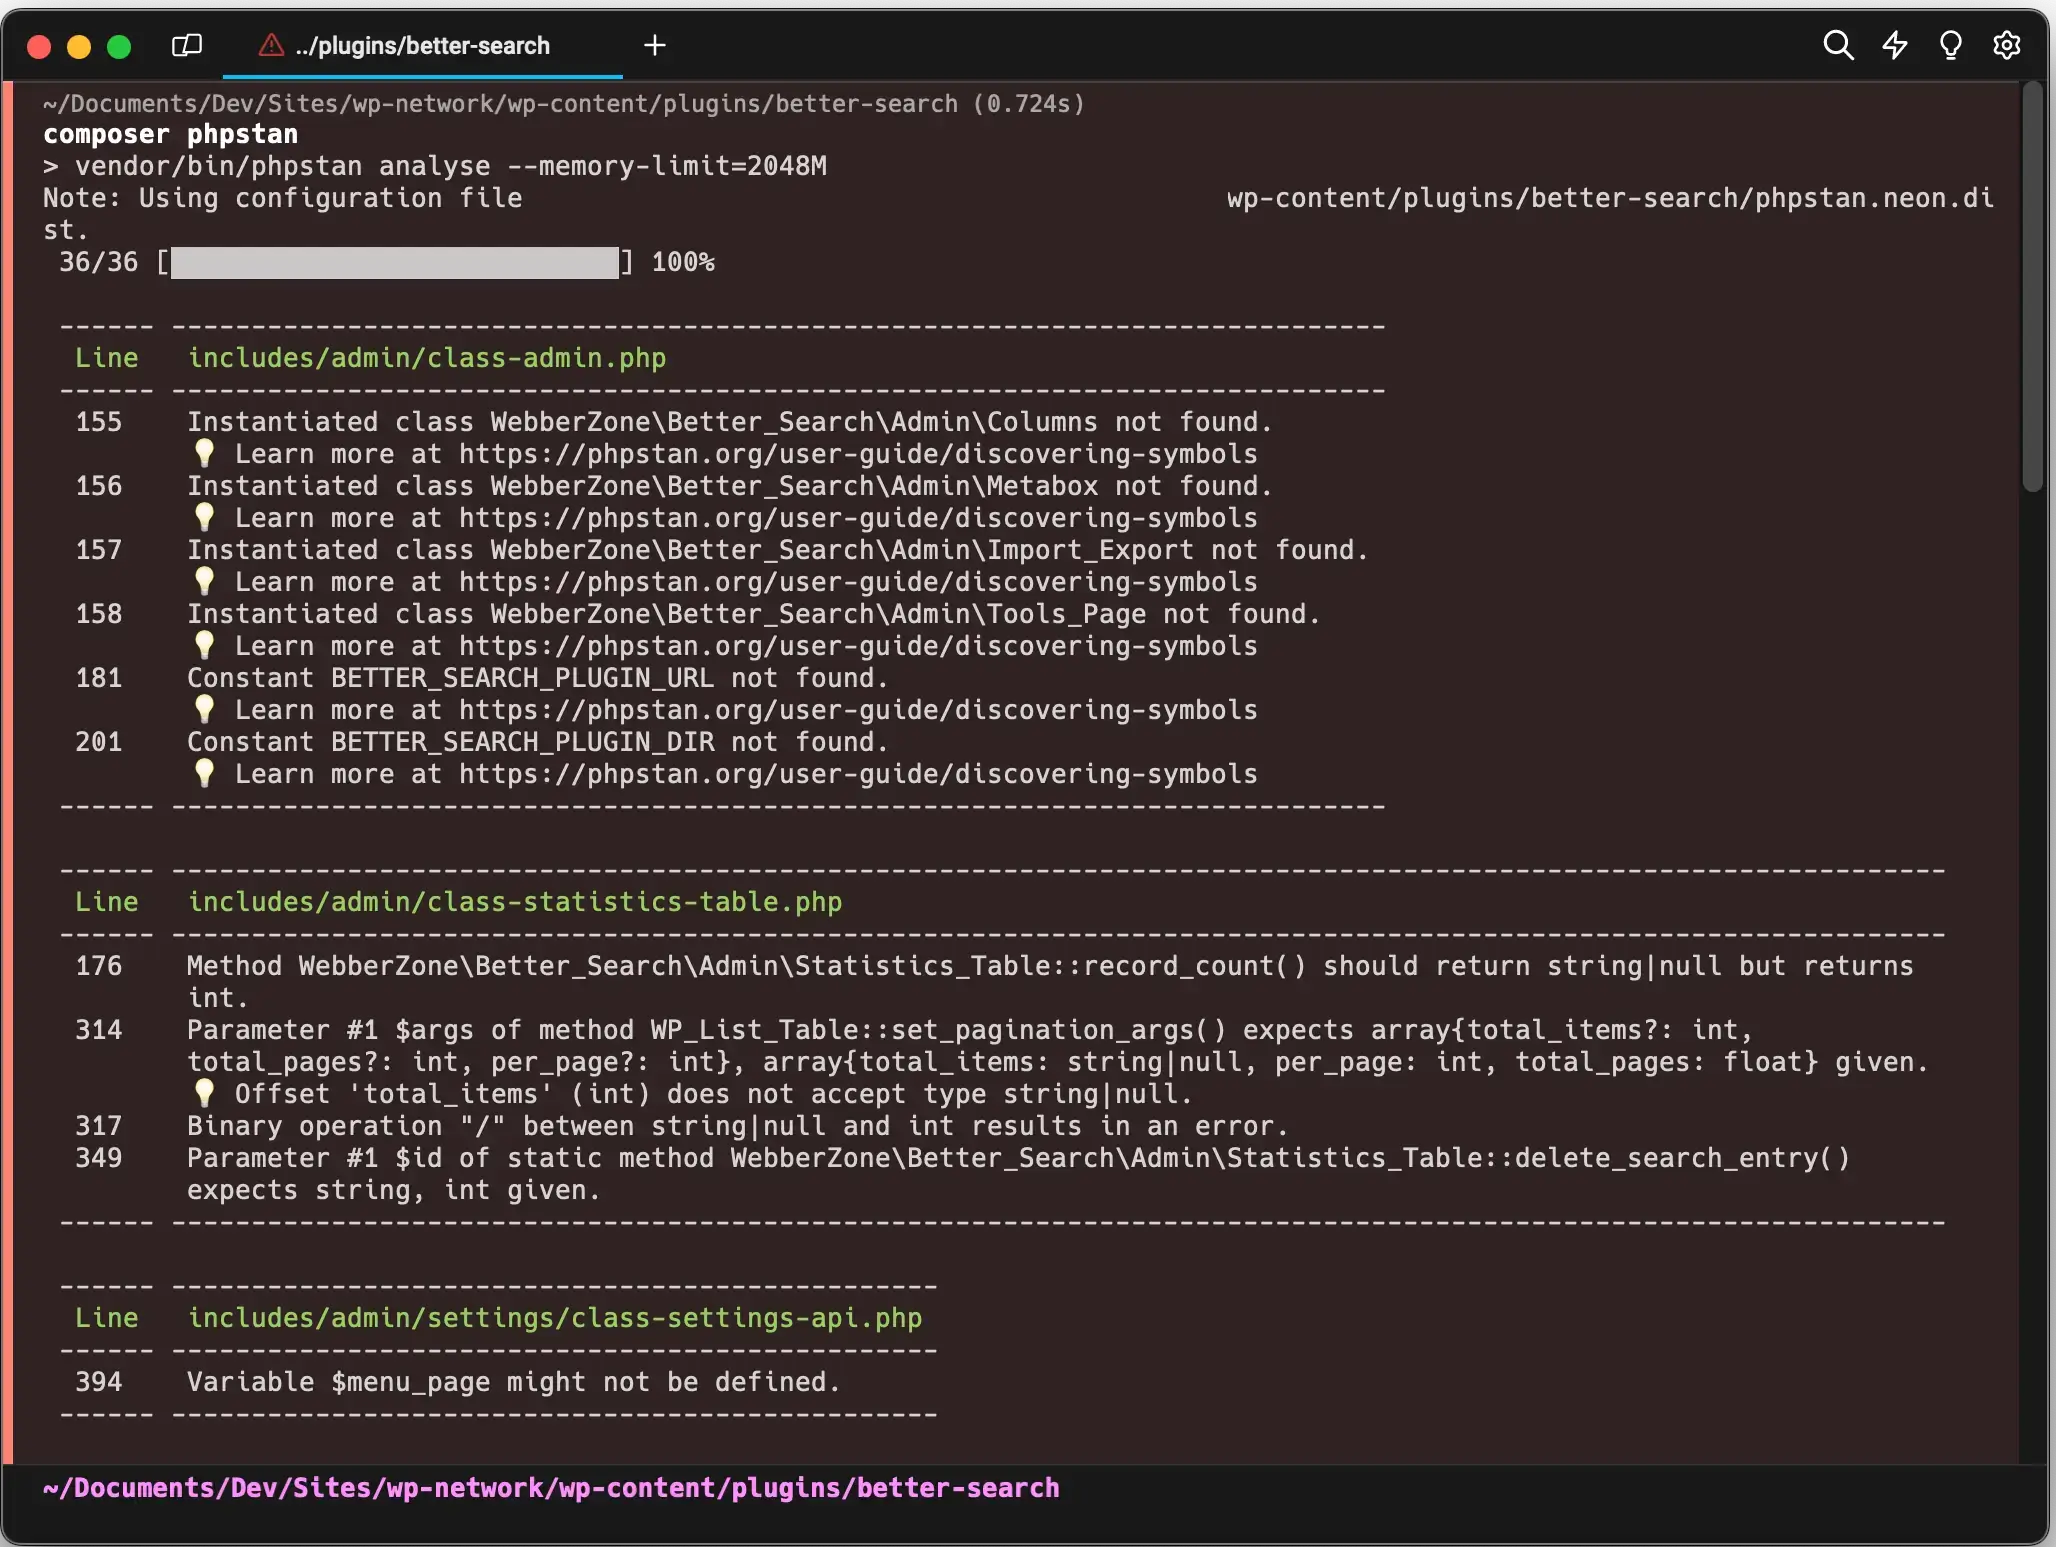
Now comes the painful task of working through each of the errors and trying to fix them.
The Baseline
As you work through the errors flagged, you will realise that you can fix a few while others are false positives. e.g. in the above screenshot PHPStan flags that the constant BETTER_SEARCH_PLUGIN_URL is not found. However, I know that I have defined this in my better-search.php file. I wasn’t able to get PHPStan to recognise these symbols.
This is where the baseline comes into play. PHPStan allows you to declare the currently reported list of errors as “the baseline” and cause it not to be reported in subsequent runs. It allows you to be interested in violations only in new and changed code.
Once you’ve fixed the errors you could and have decided the rest are not to be fixed, you can run the following in your project folder:
vendor/bin/phpstan analyse --generate-baselineIt generates the list of errors with the number of occurrences per file and saves it as phpstan-baseline.neon.
You should then include this file in the configuration file:
includes:
	- phpstan-baseline.neon

parameters:
	# your usual configuration options
This is an example of what the file looks like for my code:
parameters:
	ignoreErrors:
		-
			message: "#^Constant BETTER_SEARCH_PLUGIN_DIR not found\\.$#"
			count: 1
			path: includes/autoloader.php
Next time you run PHPStan, the errors in the baseline will be skipped in the analysis result. You can manage the baseline manually by editing the file, or generate the whole file again by running PHPStan with --generate-baseline.
Integrating PHPStan with Visual Studio Code
I use VS Code for my WordPress development. Integrating PHPStan into VS Code allows developers to leverage its powerful static analysis capabilities directly within the editor environment, providing real-time feedback and code analysis, without having to run phpstan manually from the command line.
Installing PHPStan Extension for VS Code
- Open Visual Studio Code: Launch VS Code and navigate to the Extensions view by clicking on the Extensions icon in the sidebar or by pressing
Ctrl+Shift+X(Windows/Linux) orCmd+Shift+X(Mac). - Search for PHPStan Extension: In the Extensions view, search for the “PHPStan” extension in the Marketplace. I installed the PHPStan extension by swordev from the Visual Studio Marketplace.
- Install the Extension: Click on the “Install” button next to the PHPStan extension. Once installed, the extension is ready to be configured.
Configuring PHPStan Extension Settings
After installing the PHPStan extension, configure its settings in Visual Studio Code to enable seamless integration with PHPStan in your WordPress project.
- Open the VS Code settings by navigating to
File -> Preferences -> Settingsor by using the keyboard shortcutCtrl+,(Windows/Linux) orCmd+,(Mac). - Search for
phpstanto locate the various settings for this extension.
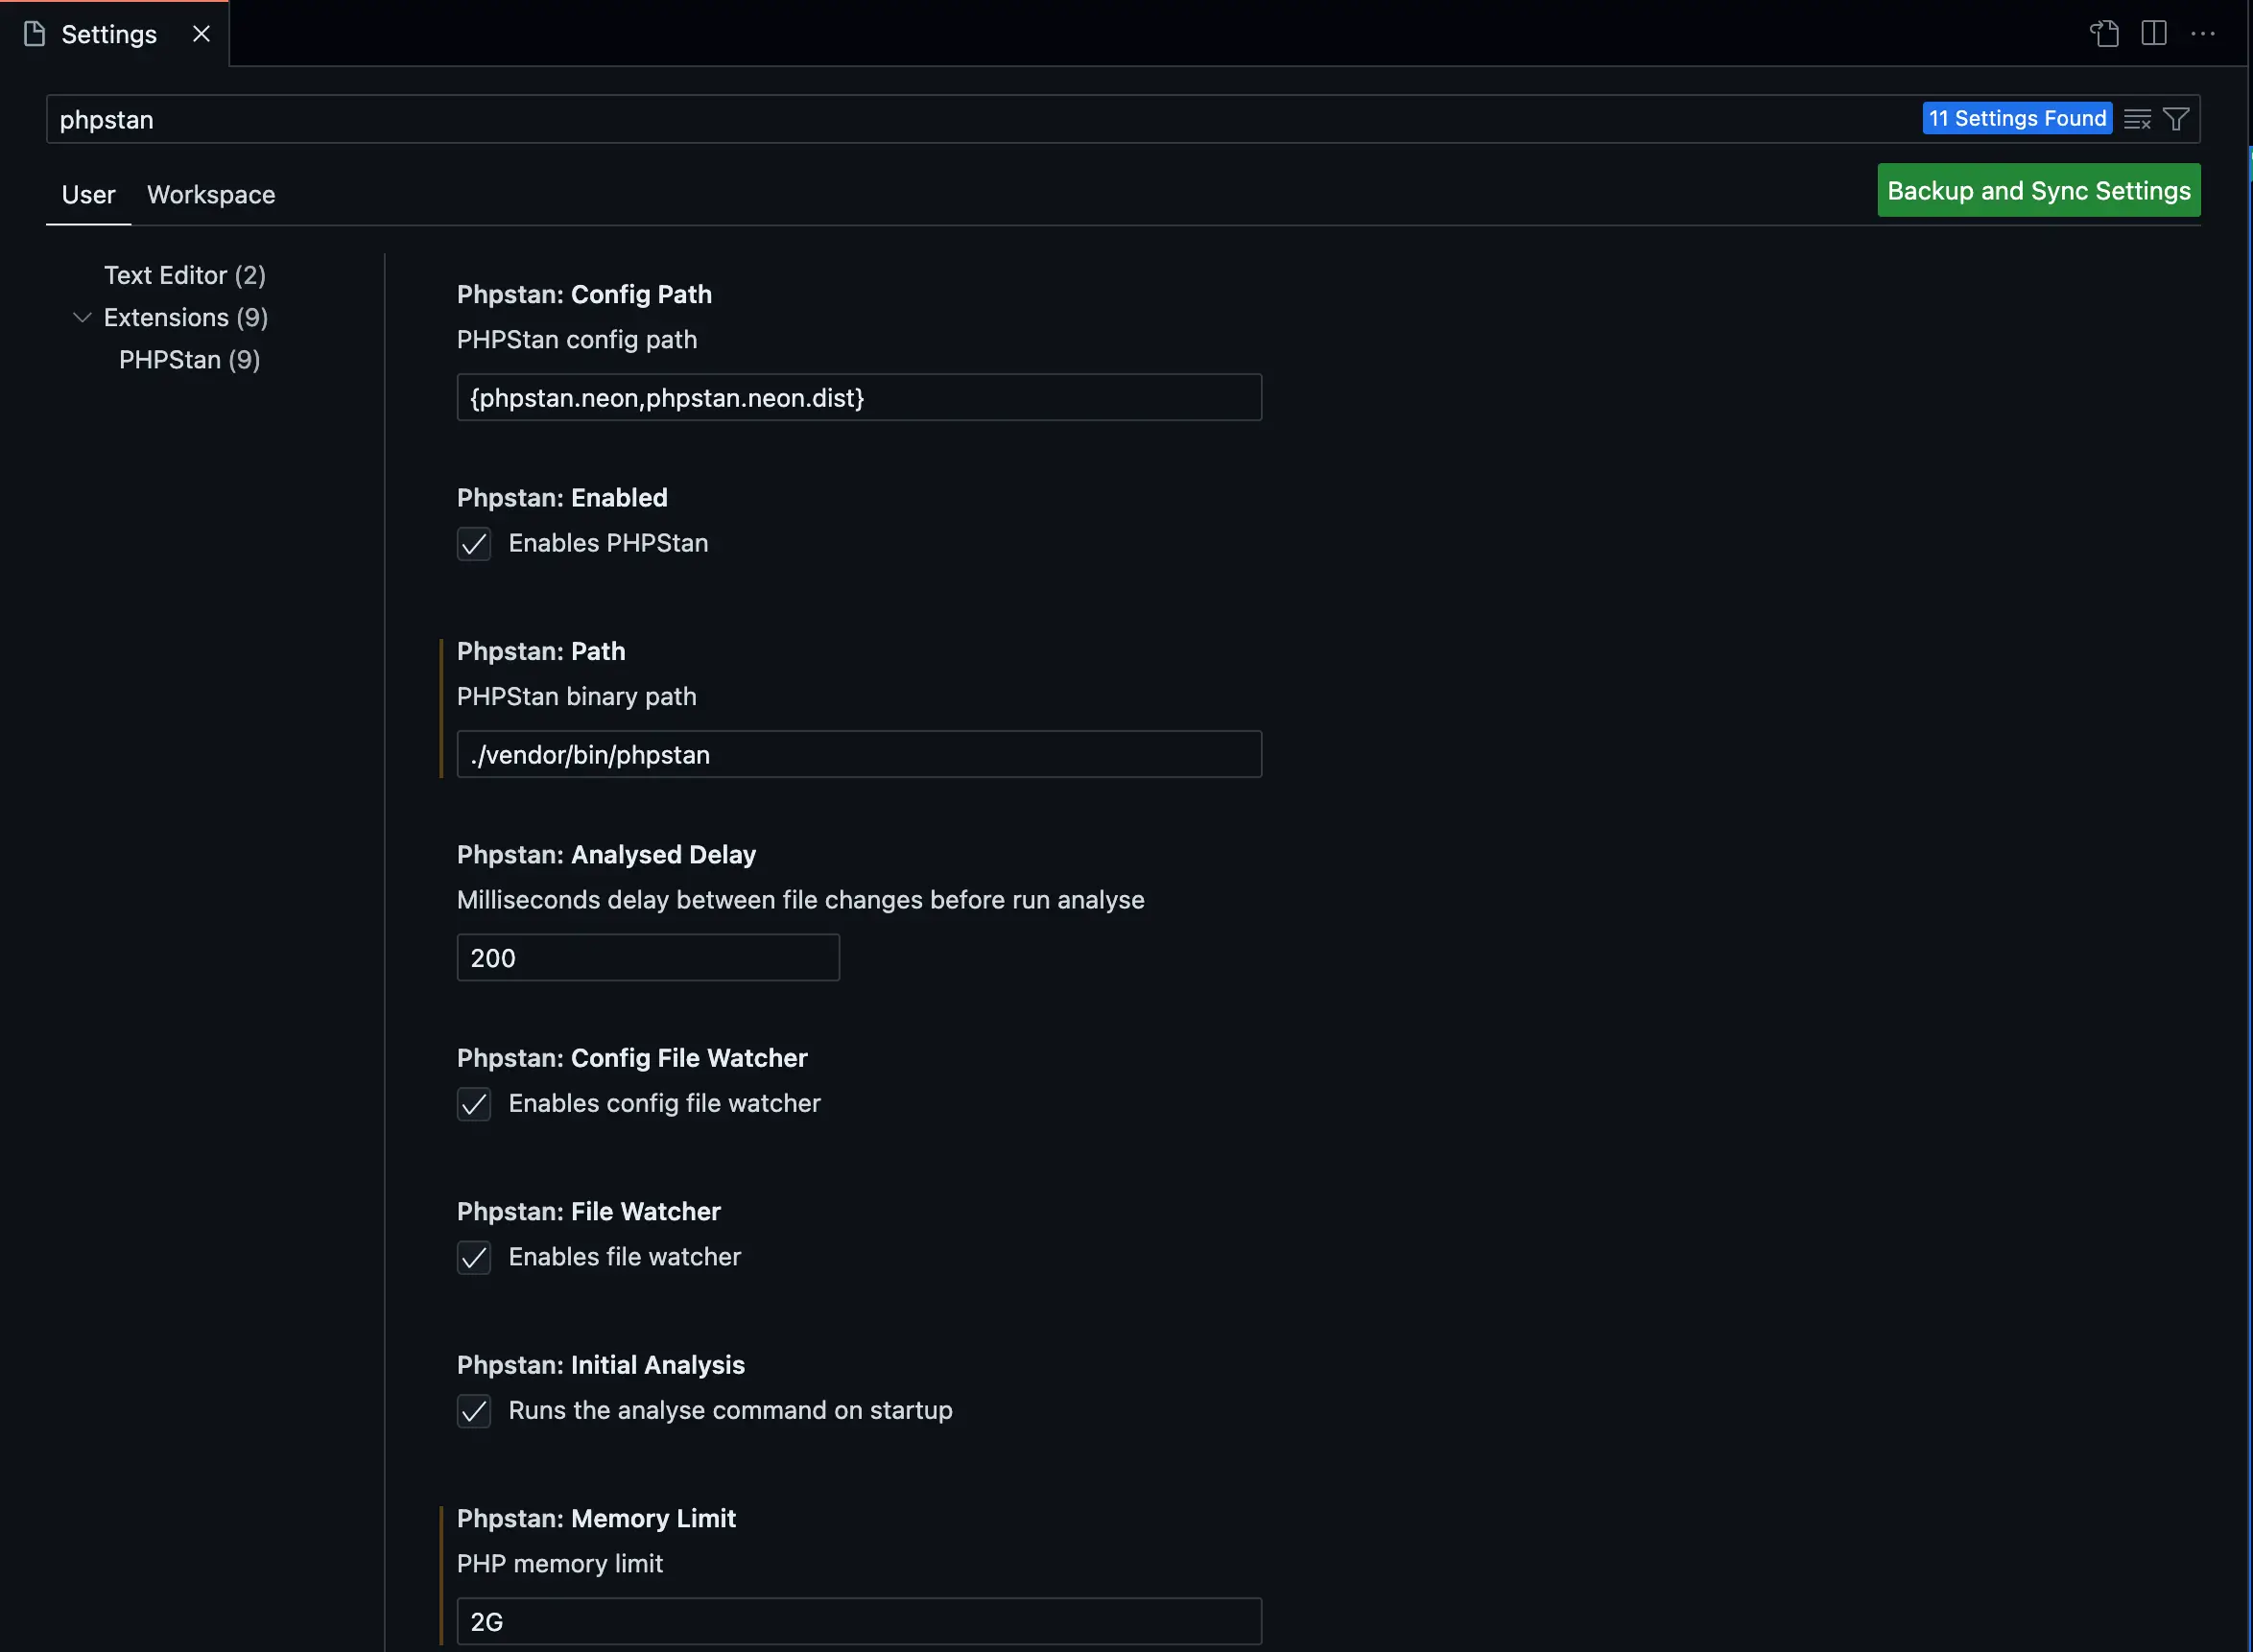
Once you have installed and configured the extension, you can use phpstan in Visual Studio Code in various ways, such as:
- Viewing the errors and warnings reported by phpstan in the Problems tab or the editor window
- Hovering over a variable or an expression to see the values inferred by phpstan
- Running phpstan on the entire project using the command palette command “PHPStan: Analyse Project”
Conclusion
In this blog post, you learned how to set up PHPStan with WordPress and Visual Studio Code. You learned how to install, configure, and run PHPStan, and how to use WordPress stubs and extensions to make PHPStan recognize WordPress functions and classes. You also learned how to integrate phpstan with Visual Studio Code.
I hope you found this blog post useful and informative. If you want to learn more about PHPStan, you can check out the following links:
I encourage you to try phpstan for your WordPress projects and see how it can help you write better code. If you have any feedback, questions, or suggestions, please feel free to leave a comment below or contact me via email. Thank you for reading and happy coding!


