The first steps in WordPress block development
This post is part of a series called WordPress Block Development Made Easy.
In 2019, I began to develop my first blocks for the block editor (formerly known as Gutenberg). It was a laborious process for me that involved coding JavaScript and PHP manually. As the block editor improved over time, so did the methods of creating blocks. However, as someone who lacked experience with JavaScript or React, I faced a steep learning curve and a major challenge in adapting to the more automated components of block development.
I decided to use the @wordpress/create-block package to build blocks in early 2022. I admit that my workflow and setup are not the most efficient, but they get the job done. I wrote this tutorial to share my experience and tips with other developers who are in a similar situation.
This tutorial is spread across three posts. This post will show you how to set up your development environment and use @wordpress/create-block to create a simple Gutenberg block. You will also learn the structure of a Gutenberg block.
Over the next two posts, you will learn how to edit and build the block. And I’ll close the series by explaining how you can create multiple blocks within the same plugin.
Prerequisites
For this tutorial, I will assume you have a basic understanding of HTML, PHP and CSS. You’ll also need to know how to create a WordPress plugin. Ideally, you’ll have at least a beginner-level understanding of JavaScript and React. You will also need to know how to run basic commands in Terminal. I use iTerm2.
This is also quite a detailed post, so feel free to skip to a section directly using the TOC below.
Step 1: Setting up the Development Environment
You can set up the WordPress Development environment using Docker and wp-env if you’re new to WordPress development. But if you already have a working development environment like me, you may prefer a different approach.
I currently use MAMP Pro on my Mac for this. You should already have a working WordPress development site locally for this tutorial.
To run the block creator, you will need to install Node.js/NPM. You can do this using Node Version Manager or via the official installers.
You will need to install Node.js greater than v14. Other versions may result in an error in the terminal. See Node Development Tools for more info.
I prefer using Homebrew to install packages I need for Mac. So, I chose to install node@14 via Homebrew.
You can run brew install node@14 if you’re using Homebrew like me. You might have time to grab a coffee while you wait for the installation of Node.
Once installed you can verify which version is installed by running node -v.
Step 2: Using @wordpress/create-block
This package is an official tool that simplifies the process of creating WordPress blocks. It allows users to design and customise blocks without writing any JavaScript or PHP code. Users only need to follow the instructions and tutorials provided by the tool to create stunning blocks for their websites.
After your development environment has been set up, navigate to /wp-content/plugins/ run the following command:
npx @wordpress/create-block basic-blockWhen no slug is provided, the script will run in interactive mode and will start prompting for the input required (slug, title, namespace…) to scaffold the project.
You can also pass some options to further customise the block created. e.g. use --variant to create a dynamic block.
When you execute the command, depending on the speed of your machine and internet connection, you’ll find a new WordPress plugin created. In this example, you’ll find a new folder called basic-block which contains a WordPress plugin that has a block of the same name.
Advanced setup: add a block to an existing plugin
If you don’t want to create a new plugin, you can use --no-plugin to scaffold block files into the current directory. This option does not integrate the @wordpress/scripts package. You should only use it if you already have npm and package.json in your plugin and you have added the @wordpress/scripts package as a devDependencies.
As @wordpress/scripts scans the ./src folder automatically, you should run npx @wordpress/create-block --no-plugin in this folder. Alternatively, run this in ./src/blocks, which is an ideal location if you’re creating multiple blocks.
If none of this makes sense to you, then I recommend simply using create-block to do the work for you. We can customise things later.
The below screenshot shows the example of creating a dynamic block in Interactive and No Plugin modes.
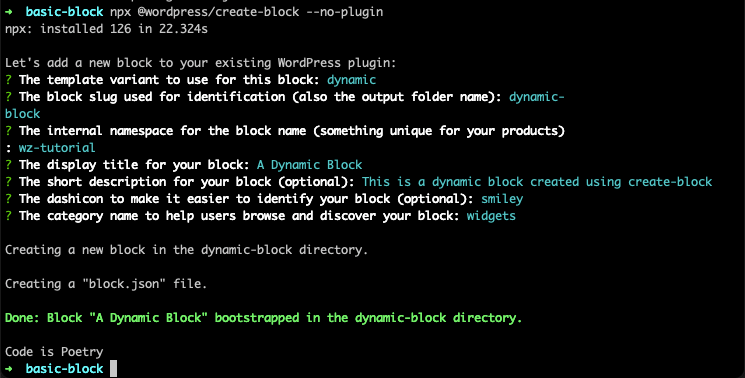
Interactive and No plugin modeStep 3: Understanding the files
Once you have created the block plugin, open the folder in your favourite editor. I use VSCode and VSCodium. You’ll see a list of files similar to the one below.
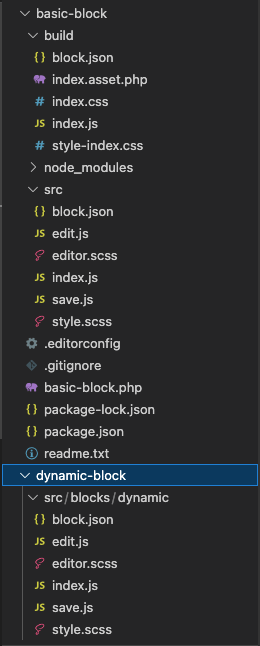
@wordpress/create-blockThere are two folders in the above screenshot. ./src which is the raw files of the block that we will edit and ./build which is the built block that is recognised by WordPress.
You’ll also note a folder above called dynamic-block where I created a block called dynamic within the ./src/blocks folder using the --no-plugin mode. Look how few files were created in this example!
1. Main plugin file
The main plugin file created is basic-block.php. You can open this up and customise the various fields. I’ll assume you’re familiar with the structure of a plugin. For the tutorial, I called the plugin Example Static block. You can now head over to your WP-Admin > Plugins page and activate the plugin.
<?php
/**
 * Plugin Name:       Example Static block
 * Plugin URI:        https://webberzone.com/
 * Description:       Example block scaffolded with Create Block tool.
 * Requires at least: 6.1
 * Requires PHP:      7.0
 * Version:           0.1.0
 * Author:            webberzone, ajay
 * License:           GPL-2.0-or-later
 * License URI:       https://www.gnu.org/licenses/gpl-2.0.html
 * Text Domain:       basic-block
 * Domain Path:       basic-block
 *
 * @package           wz-tutorial
 */

/**
 * Registers the block using the metadata loaded from the `block.json` file.
 * Behind the scenes, it registers also all assets so they can be enqueued
 * through the block editor in the corresponding context.
 *
 * @see https://developer.wordpress.org/reference/functions/register_block_type/
 */
function wz_tutorial_basic_block_block_init() {
	register_block_type( __DIR__ . '/build' );
}
add_action( 'init', 'wz_tutorial_basic_block_block_init' );
The main function in the plugin is wz_tutorial_basic_block_block_init() which in turn calls register_block_type(). As the function name suggests, it registers our block. While it takes multiple parameters, the recommended way is to use metadata in the block.json file.
In the above example, WordPress will hunt for the block.json file in the ./build folder.
2. The block.json file
When you open up the block.json file, you will see the below contents.
{
	"$schema": "https://schemas.wp.org/trunk/block.json",
	"apiVersion": 2,
	"name": "wz-tutorial/basic-block",
	"version": "0.1.0",
	"title": "Example Static block",
	"category": "text",
	"icon": "network",
	"description": "Example block scaffolded with Create Block tool.",
	"supports": {
		"html": false
	},
	"textdomain": "basic-block",
	"editorScript": "file:./index.js",
	"editorStyle": "file:./index.css",
	"style": "file:./style-index.css"
}
The three important files that are specified by the properties editorScript, editorStyle and style. The first two are the JavaScript and CSS files that are loaded in the block editor while the last one is the CSS file loaded in the frontend.
Also, the block that we are registering is wz-tutorial/basic-block where wz-tutorial is the namespace and basic-block is the block. If you’re building your plugin you should maintain a consistent and unique namespace.
For more details about what can go into this file, check out the Metadata in the block.json article. An important property not specified above is attributes. More at that later on.
3. The package.json file
This file is used by npm and subsequently the @wordpress/scripts package to build your block from the raw files. When using the start or build commands, the source code directory ( the default is ./src) and its subdirectories are scanned for the existence of block.json files. If one or more are found, they are treated as entry points and will be output into corresponding folders in the build directory. This allows for the creation of multiple blocks that use a single build process. The source directory can be customised using the --webpack-src-dir flag.
{
	"name": "basic-block",
	"version": "0.1.0",
	"description": "Example block scaffolded with Create Block tool.",
	"author": "webberzone, ajay",
	"license": "GPL-2.0-or-later",
	"homepage": "https://webberzone.com/",
	"main": "build/index.js",
	"scripts": {
		"build": "wp-scripts build",
		"format": "wp-scripts format",
		"lint:css": "wp-scripts lint-style",
		"lint:js": "wp-scripts lint-js",
		"packages-update": "wp-scripts packages-update",
		"plugin-zip": "wp-scripts plugin-zip",
		"start": "wp-scripts start"
	},
	"devDependencies": {
		"@wordpress/scripts": "^25.4.0"
	}
}
Step 4: Understanding the block anatomy
The block consists of multiple different files. You will find these in the ./src folder. In there you will find the following files:
- block.json (as described above in Step 3)
- index.js
- edit.js
- editor.scss
- style.scss
- save.js (for static blocks)
- render.php (for dynamic blocks)
1. index.js
The main file for the block is the index.js file, the contents of which are in the screenshot below.
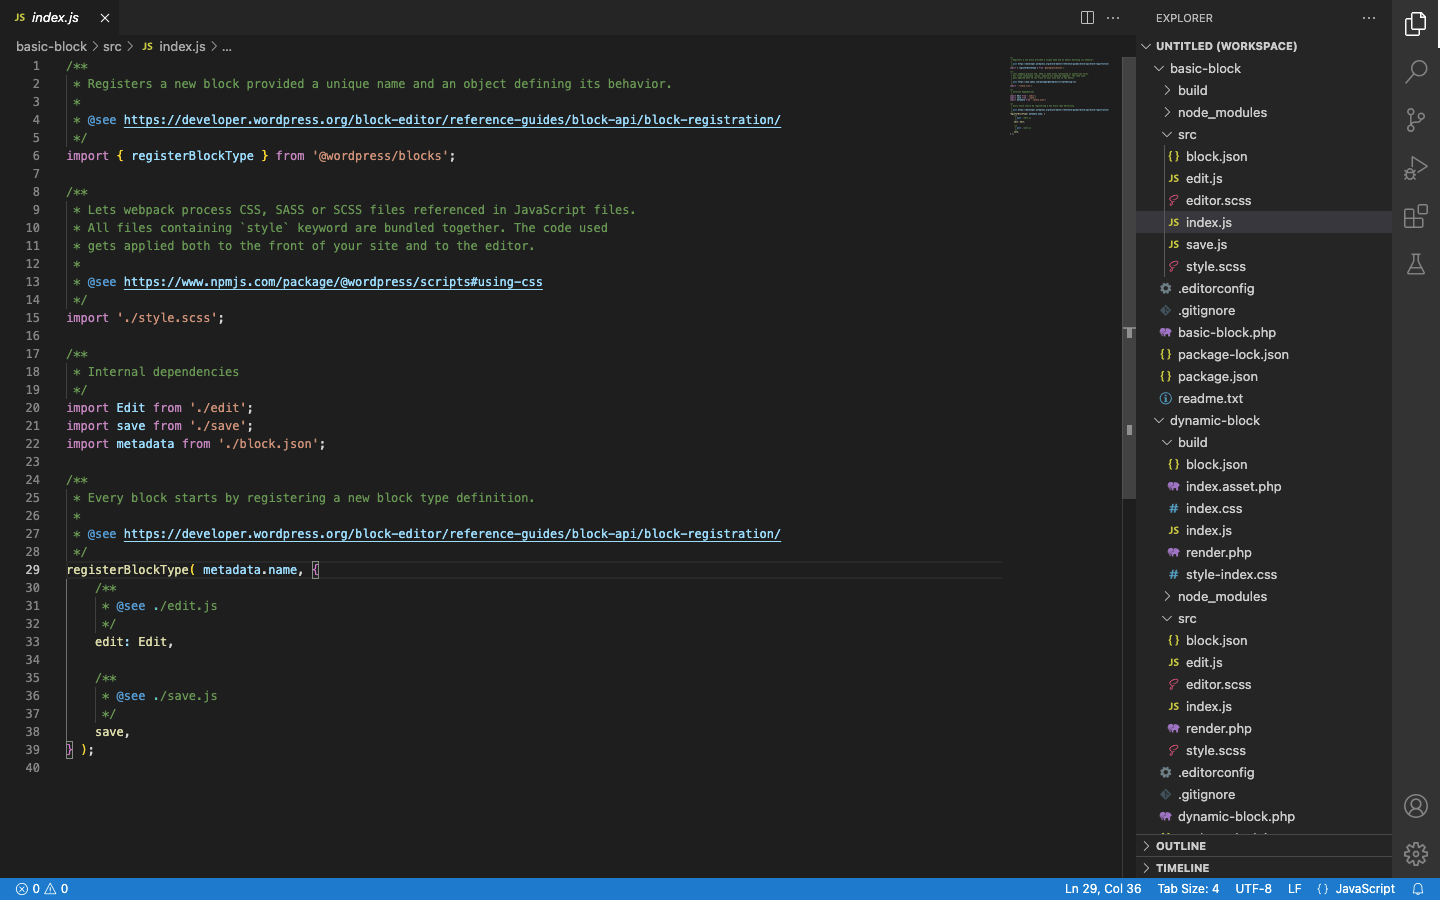
index.js fileThe main function there is registerBlockType() which is the JavaScript function that registers the block. It takes the block name (i.e. wz-tutorial/basic-block) as the first parameter. To ensure consistency, we first “import” the metadata from the block.json file and then pass metadata.name to this function.
The second parameter of the function is the block object.
The two block object properties are edit and save and are the key parts of a block. Both properties are functions that are included via the import a few earlier.
The results of the edit function are what the editor will render to the editor page when the block is inserted.
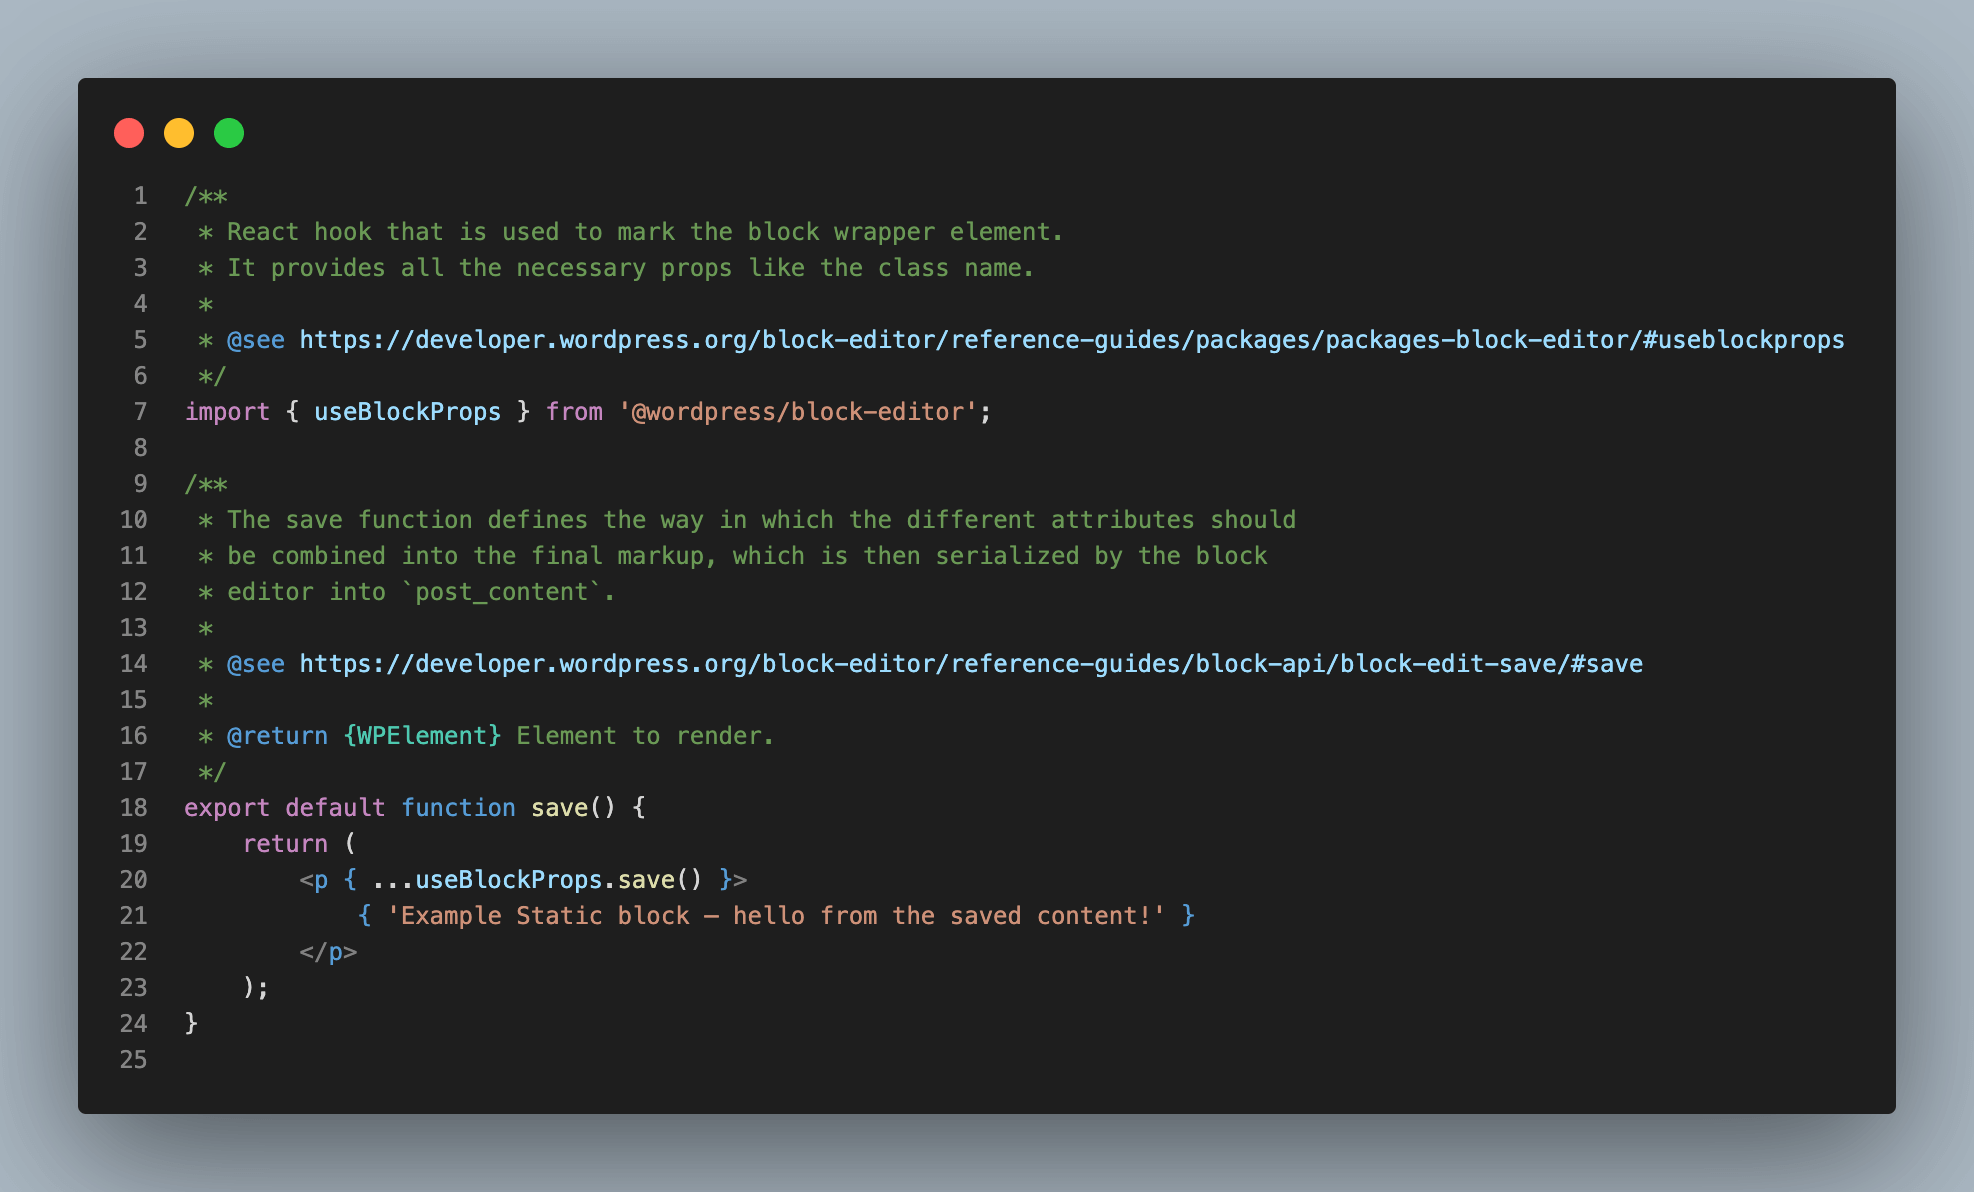
The results of the save function are what the editor will insert into the post_content field when the post is saved. The post_content field is the field in the wp_posts table in the WordPress database that is used to store the content of the post.
See the block registration documentation for full details.
2. Block attributes
Block attributes provide information about the data stored by a block. The attributes property in the block.json file defines how a block is parsed to extract data from the saved content. The attribute definition will contain, at a minimum, either a type or an enum. There can be additional fields.
"attributes": {
    "url": {
        "type": 'string',
        "source": 'attribute',
        "selector": 'img',
        "attribute": 'src',
    },
    "title": {
        "type": 'number',
        "default": 10,
    },
    "size": {
        "enum:" [ 'large', 'medium, 'small' ],
    },
},
In this example, the attribute url is of type string whose source is the HTML element called img with the attribute src providing the value., The second of the type number and the third just provides the enum i.e. list of options. The default property specifies what the block will use in case the corresponding property is not explicitly set.
See the Attributes documentation for full details.
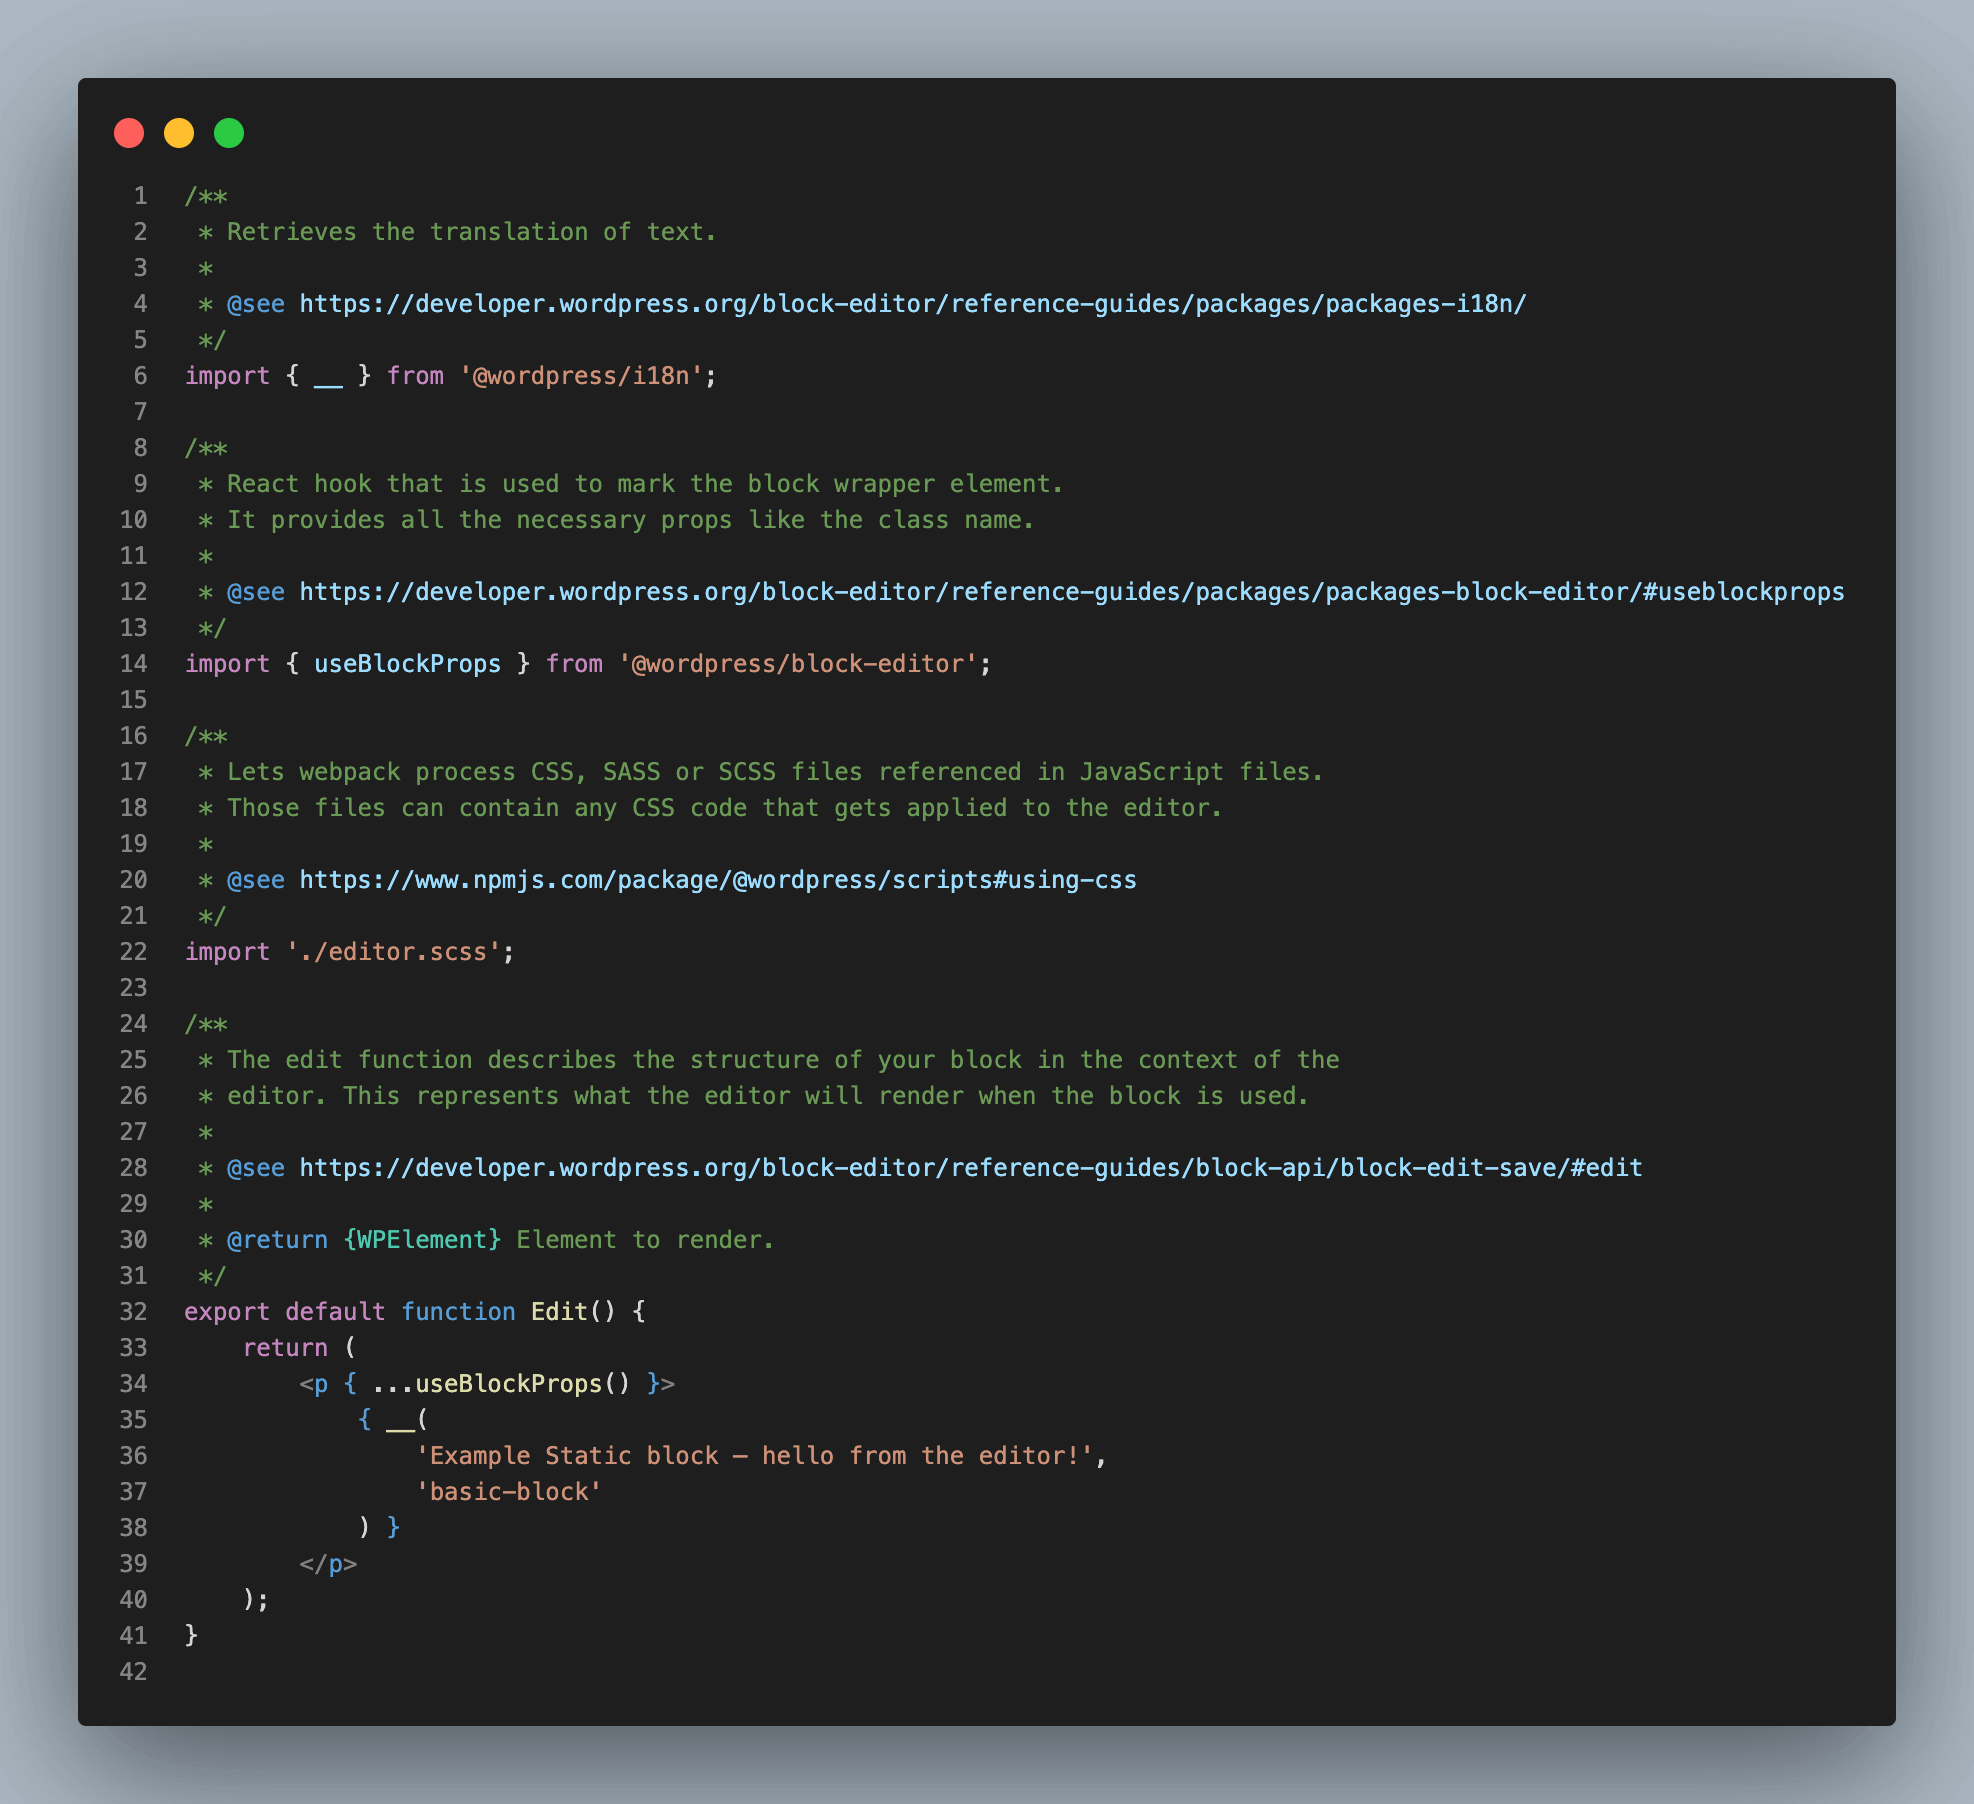
3. edit.js
This file holds the file where you build the block interface that is used in the block editor.
4. save.js
This handles how the block is saved to the WordPress database. If you’re building a dynamic block, you won’t use this file.
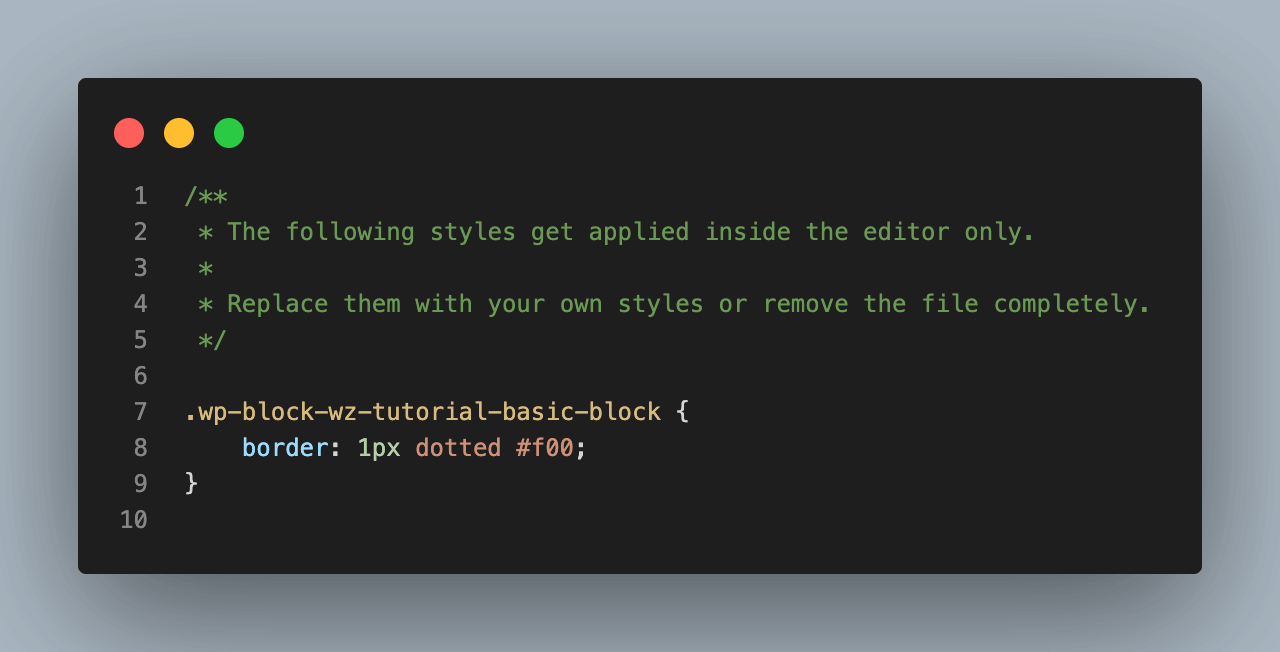
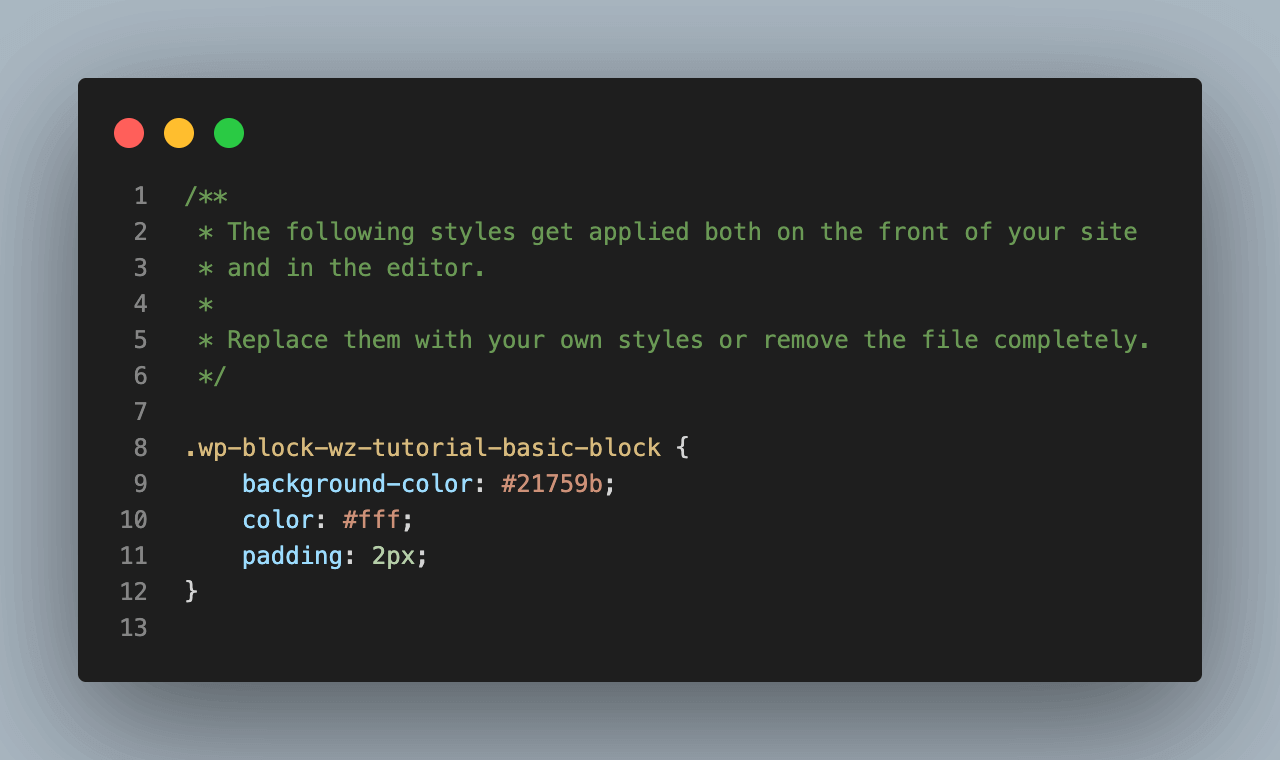
5. editor.scss and style.scss
These are two SASS files which hold the CSS styles that the block uses in the editor and the frontend respectively.
6. render.php
Since WordPress 6.1, the block.json file supports the render attribute. This allows you to specify a PHP file that will be included when the block is rendered in the front end. This allows you to create a dynamic block that will be rendered on the fly. Particularly useful for complex and non-static blocks.
In prior versions, you could use the render_callback argument for register_block_type() to create dynamic blocks. This is how my WordPress blocks are currently built.
Step 5: Insert the block
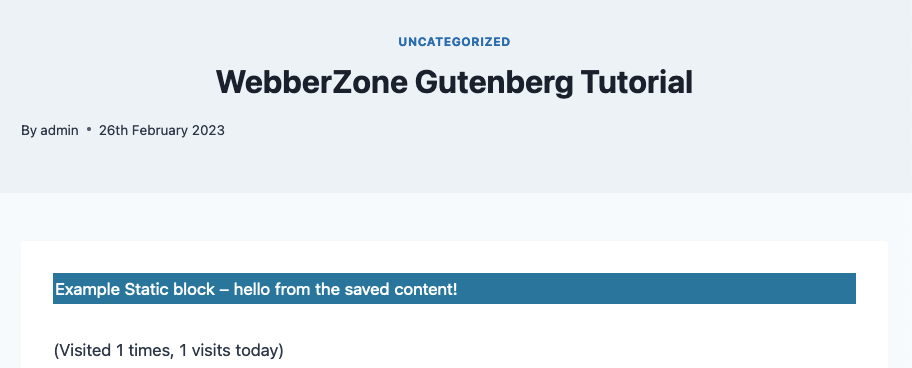
Head over to WP-Admin > Posts > Add new to create a new post. To insert the block click the + button in the top left, find the Example static block and click it. You can also use the shortcut / to find the block within the editor.
Save or publish this post and you can preview it in the frontend. Note the different text from the editor.
In the next instalment…
I hope by now you are familiar with:
- How to install and use
@wordpress/create-block; - Developed a basic understanding of the various files within a block plugin created by this tool; and
- Understood the difference between what a basic block looks like in the backend and frontend
In the next post, we will start customising the block by editing the various files to add attributes (options). You will also learn how to use the @wordpress/scripts package by running the various npm commands.
Missed anything in this post, please do comment below.
Sources
These are a few sources that helped me learn block development and to subsequently write this tutorial.


Nice work Ajay! Did you have any trouble with the style sheets dynamically updating? I make a change in style.scss and it was not reflected in the editor (it stayed the old background color). You probably saw me ranting about that on the Twitters and I am still wondering if I did something wrong.
Thank you! I’m going to go into that customisation in the next post.
I’ve not faced this issue on my existing blocks but conscious it’s not the latest version of create-block. I think there are a few things worth checking. The first one I keep forgetting to do at times is to either run the “build” or “start” scripts. The other issue is a clash of styles as you both style.scss and editor.scss are loaded in the editor. Third one is the caching if you’re using a CDN in particular. I fight a bit more with my online sites on this.