How to Self-Host Google Fonts in WordPress with Kadence
Fonts play a crucial role in creating an appealing and engaging website. They enhance the overall aesthetics and readability of your content. Google Fonts is a popular choice for many website owners due to its vast library of high-quality fonts.
However, loading fonts from Google’s servers can have some drawbacks, such as slower performance, privacy issues, and potential blocking by some countries. That’s why some users may prefer to self-host Google Fonts on their servers, which can offer more control and flexibility.
I’ve recently been exploring themes to redevelop WebberZone and amongst the long list of popular ones, I’ve zeroed in on Kadence as a potential theme I plan to use here.
In this blog post, I will show you how to self-host Google Fonts (or any other custom font) in WordPress with Kadence.
Why Self-Host Google Fonts?
Self-hosting Google Fonts offers several advantages. Let’s take a look at some of the key reasons why you might consider self-hosting Google Fonts on your WordPress website:
- Improved Performance: Hosting fonts locally reduces external dependencies, leading to faster load times and better overall website performance. Users accessing your website will experience quicker page rendering without relying on external servers.
- Increased Security: When you self-host fonts, you have complete control over them. External font servers can be a potential vulnerability that hackers could exploit. By hosting fonts on your server, you reduce the risk of security breaches.
- Compliance with Privacy Regulations: In some cases, external font servers may collect user data, potentially raising concerns related to data privacy regulations. Self-hosting Google Fonts helps you maintain control over user data and ensure compliance with privacy regulations.
- More customisation: By hosting fonts on your server, you can have more control over how your fonts are displayed and loaded. You can choose which font formats, weights, styles, and subsets you want to use, and optimise them for different browsers and devices.
Step 1: Download the Google Fonts you want
Now that you know the benefit of self-hosting Google Fonts, let’s see how to do it with Kadence WordPress Theme.
Download the Google Fonts you want to use from https://fonts.google.com/. You can select multiple fonts and styles by clicking on the plus icon next to each font name.

Then, click on the download icon and save the zip file to your computer.

Extract the zip file and locate the font files in the .woff or .woff2 format. These are the web font formats that are supported by most browsers. You can delete the other files that are not needed.
If you’re looking to use a non-Google font, you will need to get them into .woff or .woff2 format. You can use Transfonter which will allow you to convert fonts. It will also give you the CSS code.
An alternative way to download Google Fonts is to use the Google Webfonts Helper (GWFH). In particular, this also gives you the CSS code that we can use in the next step. This tool will help you create the @font-face rules that tell your browser where to find and load your fonts. You can customize the font names, weights, styles, and subsets according to your preferences.
Step 2: Upload the font files
Upload the font files to your WordPress site using an FTP client or a file manager plugin. You can create a new folder in your wp-content directory and name it something like fonts or webfonts.
If you’re using a child theme (and you should), upload the font files into the theme folder. In my child theme that I created for Kadence, I save the fonts in the assets/webfonts folder. Having a child theme will also help centralise the PHP code we need in the functions.php file.
Make sure the folder permissions are set to 755 and the file permissions are set to 644.
Step 2: Add the CSS to your theme
If you’re using the GWFH, it will give you the custom CSS code you need to use. If you’re only targeting modern browsers, select that and it will limit it to woff and woff2 files. woff2 is supported by most modern browsers today.
This is the sample code for the Lato font. I have one change to the CSS code that GWFH produces: I added local as a source. If a font is installed in the user’s system, then it will be used before downloading the one from your site.
@font-face {
	font-display: swap;
	font-family: 'Lato';
	font-style: normal;
	font-weight: 400;
	src: local('Lato Regular'), local('Lato-Regular'),
		url('assets/webfonts/lato-regular.woff2') format('woff2'),
		url('assets/webfonts/lato-regular.ttf') format('truetype');
}
Copy the CSS code and paste it into your WordPress site using one of these methods:
- If you are using Kadence WordPress Theme, you can go to Appearance > Customize. Click on the Additional CSS section, place your custom CSS code in the text area, and hit Publish.
- If you are using a child theme, you can paste the code into your child theme’s style.css file. Remember to enqueue it.
- If you are using a plugin like WebberZone Snippetz, you can a new custom snippet and paste the code there or in the Header in the Settings page of the plugin.
Step 3: Change Kadence Performance settings (optional)
Kadence has an setting inbuilt that allows you to host your fonts locally. Simply go to the WordPress Customizer, and navigate to General > Performance.
Under Performance, turn on Load Google Fonts Locally as well as Preload Local Fonts. Flush the local font files to clear the cache.
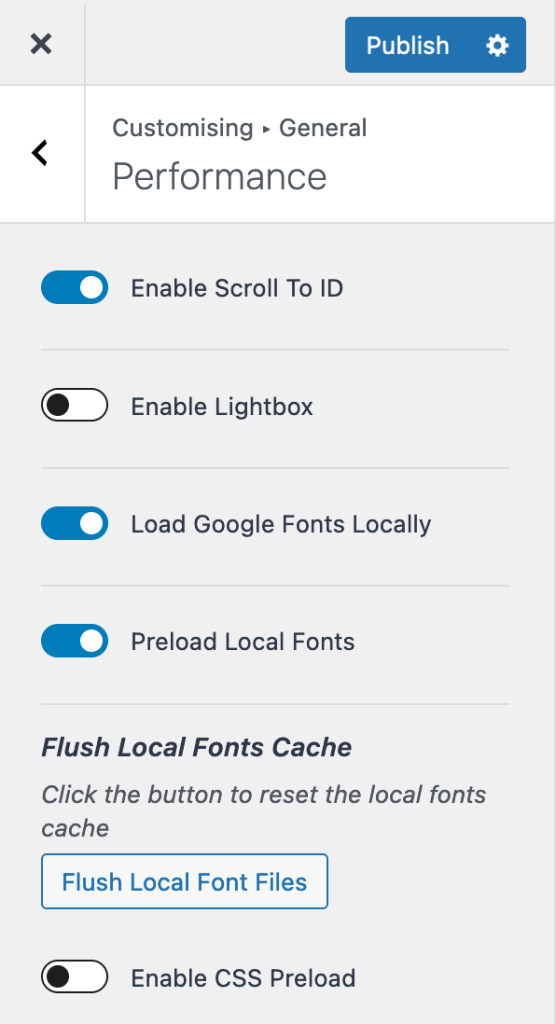
Turning this setting on will tell Kadence to extract and save the Google font on your server and it then loads it up dynamically. Ideal if you only plan to use a single font with no fallback. This is a good no-code solution. On the flip side, it gives you lesser control vs what I propose in Step 4.
Step 4: Override Kadence’s default theme options
This step will make it easy for you to have more control over your fonts, especially if you have custom fonts that are not Google Fonts.
/**
 * Update Kadence default options.
 *
 * @param array $options Default options array.
 * @return array Updated default options array.
 */
function wz23_update_kadence_options( $options ) {
	$options['base_font']['family']    = '"Lato", "Helvetica Neue", Arial, sans-serif';
	$options['heading_font']['family'] = '"Raleway", "Helvetica Neue", Arial, sans-serif';

	return $options;
}
add_filter( 'kadence_theme_options_defaults', 'wz23_update_kadence_options' );
You can find a full list of default settings in the file /inc/components/options/component.php > default function.
For example, if you want finer control and use different fonts for different headings, instead of using heading_font above, you can use h1_font, h2_font, etc. You can adjust other settings like font size, weight, style, line height, letter spacing, etc.
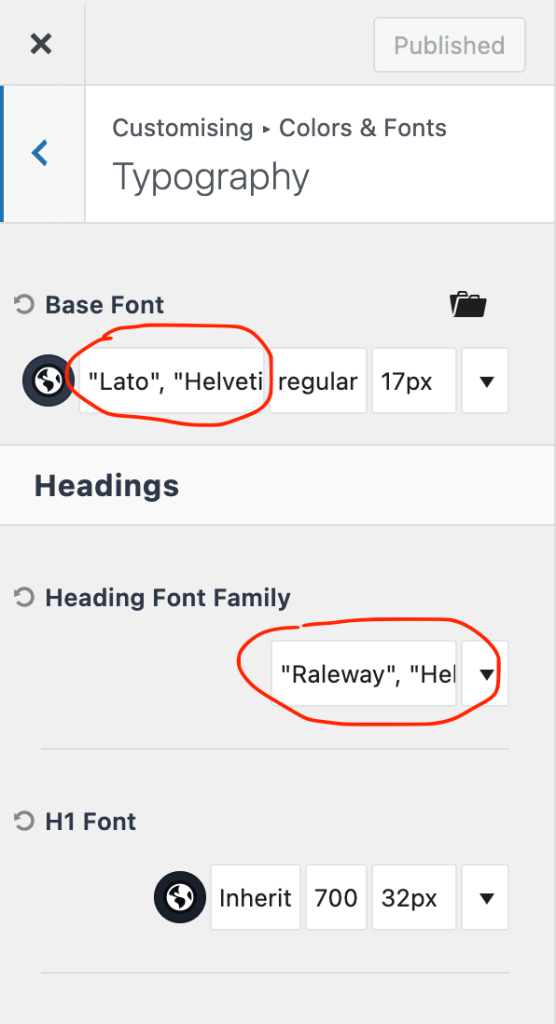
Step 5: Save the custom font settings via Customizer
Once you have done this, you can head over to Customiser > Coolers & Fonts > Typography. You will see that the base font and heading fonts now reflect the set of fonts from the previous step.
Publish your changes and check your site to see your self-hosted Google Fonts in action.
Step 6: Style individual items in CSS
Besides the above approach, you can also style individual items, classes or IDs in CSS and assign them a font using font-family.
.custom_class {
	font-family: 'Merriweather', 'Helvetica Neue', Arial, sans-serif;
	font-size: 18px;
}
Closing words
In summary, self-hosting Google Fonts in WordPress with Kadence WordPress Theme is a great way to improve your site’s performance, privacy, and accessibility by loading fonts from your server instead of Google’s. You can also enjoy more flexibility and customisation options. However, self-hosting Google Fonts also requires more maintenance and testing than loading them from Google’s servers. You should weigh the pros and cons carefully before deciding which option is best for your site.


Hi, thank you for this tutorial. I’m struggling to get my fonts into my website. Steps I undertook:
– create child theme with style.css and functions.php
– style.css with instructions above with changed url and font name
– functions.php with the following text:
<?php
/* enqueue script for parent theme stylesheeet */
function childtheme_parent_styles() {
// enqueue style
wp_enqueue_style( 'parent', get_template_directory_uri().'/style.css' );
}
add_action( 'wp_enqueue_scripts', 'childtheme_parent_styles'); )
– Uploaded the fonts to wp/content/themes/kadence-child/assets/fonts
– Overrode Kadence’s default theme options as described in step 4. Since I didn't know where to write this function I had to guess and put it in the functions.php of the Kadence parent theme. This worked as in I can now see my custom fonts displayed as h1, body etc. but it's not available in the drop-down-menu. Is that how it should work?
Thank you for your help and your great tutorial!
Now the problem: My custom fonts are not being displayed on my website. When I do copy the code from the child's style.css in the css editor on Elementor the code works and my custom fonts are being applied.
So it seems that there is something not working properly and the information of style.css in my backend is not being applied to my website. Can you advise on what the problem might be?
I guess it has something to do with the two functions.php ?
Slightly older version, but do you want to take a look at how I did my child theme?
https://github.com/WebberZone/webberzone2023